

Saturday, October 15, 2011
Klamath Community Craft Day- Fake Flower Hair Clips
Same thing happened with these clips. I signed up to make 3 but it turns out that meant 3 sets of 3. Which means I got to make 9 of them. I like this kind alot though. I think they would look adorable on a little girls head.


Klamath Community Craft Day- Silk Flower hair cips
An interesting story about these flowers. I thought I signed up to make 6 of these. But it turns out I signed up to make 6 sets of them and a set is 3 flowers. Which means I got to make 18 of these bad boys. They got easier as I went but they are suprisingly time consuming.


I made some bright colored ones, some zebra ones, some sparkly ones and some brown/more neutral ones. I think they turned out pretty alright. They all have hair clips attached to the back. Now I dont really know what to do with them I was only making them so I knew how to do it and now I have a ton. Maybe I'll use them as gifts. Or save them incase I have a little girl someday.
Klamath Community Craft Day- Menu Planner
 This Project was much more time consuming and I'm not even completely finished yet. First you take a thin board and paint it a base color. When that is dry you modge podge the 3 1/4" inch strip of paper to the top and 1 1/4" strip to the bottom. Then when that was dry I took a ribbon and placed it where the paper meets the wood with a hot glue gun. Then I made the envelopes for the side. The top envelope will contain the names of favorite, common or easy recipes cut in strips so they can be clipped on the different days. The day clips are just clips with a decal that i painted and wrote the day of the week on. The bottom envelope can be used for actual recipes or your grocery list. I want to completely finish it eventually, but so far im liking it.
Klamath Community Craft Day- Wooden Pumpkins

1. You need wood. A 2X4 works best.
2. Cut the wood into equal lengths. 3"-6" or whatever you like best
3. Paint the sides of the blocks whatever color orange you like best
4. Use a strip of Green fabric to tie the blocks together. Tie in a bow at the top
5. Add raffia or twin to give it some character
Thats it! And now you have very cute easy to make pumpkin decorations.
Klamath Community Craft Day- Old Window Project
Today I went to the Klamath Community Craft Day and got these two old windows, which are alot bigger than I thought that they were going to be. Anyways they are split horizontally into two panes. I have some idea already of what I would like to do with them.


My Ideas
Chalkboard
Bulletin board
calender
magnetic
picture holder
Those are my ideas but I thought I would look online anyways. Here is what I found that I liked.
This window has alot going on. It has magnets, pin board and chalkboard.
This just takes chicken wire and clothes pins.
I really really like this and someday I WILL find a window that will work for it!
Well thats the Idea. Although I really wish I had windows like the last one.
Wednesday, October 5, 2011
Grow a few inches.... Or..
Get a stool! It's so frustrating to not be able to rich the top shelves in the kitchen. Or get things down that I put above the cupboards. That is why I got myself this handy dandy stool! Just a couple dollars at Goodwill. Our Goodwill is seriously lacking in this town but this is one good thing to come from it. Only it was not a pretty stool and it did not match my kitchen whatsoever. So being the crafty girl that I am I decided to give it a makeover!! Now it looks great in my kitchen and easily slides under the table when I dont need it or it is in the way.
 So its not very pretty. I mean its got some style its just not working it very well. Its hard to see the knicks, scratches and marker in this picture but its there, trust me.
 The first thing I did was sand it to even out the dings and marks. Plus, sanding gives it a rougher surface so that paint sticks better to it.
 I picked out red paint that matched the microwave stand we have in the corner of the kitchen. I personally feel that this red has a country feel to it. When I see reds like this one I just imagine seeing it in a country house out in the boondocks. I also sanded the stool after I painted it to give it a distressed look. Now it doesnt look brand new but it looks great in my Kitchen.
 Perfect for reaching the top shelves!

 The first thing I did was sand it to even out the dings and marks. Plus, sanding gives it a rougher surface so that paint sticks better to it.

Tuesday, October 4, 2011
Perfect Halloween Costume!
Someday in the future if I have a little girl I am going to do this for sure! I love it :) And the best part is you can make more than one outfit haha
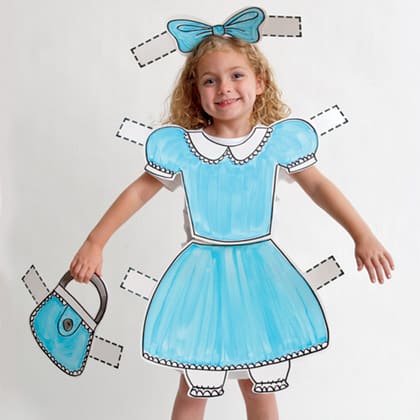 |
| www.livinglocurto.com |
Monday, October 3, 2011
What I love about Autumn
What I love ....
1. The Colors!
2. The smells: pumpkin spice, cinnamon, etc..
3. The spirit of fun and thanksgiving
4. Food! Great food
5. Candy
6. Decorations! Fall leaves, pumpkins, hay....
7. Leaves changing colors
8. Leaves falling from trees
What I could live without...
1. The word "gourd" its just not a pretty word
2. Creepy decorations: blood and goo!
Autumn Project: #2

I also found this pumpkin idea! This one is also made with just paper ribbon and twine. The stem is even made from just a rolled up piece of brown paper. I'm learning people can be very creative with everyday materials. I want to try this one next but I dont have any more orange colored paper. Although it shouldnt be hard to find :)
Autumn Project: Numero Uno

I found this online, I googled cheap autumn decorations and on the mommysavers.com website I found this idea and I can't wait to try it out!
Just cut out six circles or ovals, fold them in half with the pretty side inside, then glue the halves together. Then you trim off the bottom so it stands up, and cut out a stem.
To get one pumpkin out of a 12x12 piece of paper, use a 4x6 oval.
Arn't they so cute! Im about to go enlist Trevor to help me create some.
Sunday, October 2, 2011
Breakfast at Tiffany's

Saturday, October 1, 2011
Project Kitchen- The Only Countertop

The Star above the sink I picked up at Porters. It was a sidewalk sale so it was a good price, too good to walk away from. And I'm so glad that I did pick it up because it looks perfect in the kitchen. It gives just the right amount of country touch. The main color in our kitchen is red. Which is perfect for the country theme and sunflowers are a great accent on red! I love sunflowers! Another great accent is light blue. The pictures I put up are a few of our engagement pictures that my Aunt Kristin took in front of a red wall. We had them hanging up at our wedding which was a sunflower themed wedding. As you can see the decorations in the kitchen are pretty simple. I picked up a plant box from a thrift store and it now holds are tomatoes or fruit whichever we have on hand. The basket was part of a wedding present which I put some crocheted circles in and a sunflower plate. It added a pop of color which I love!
Project Kitchen- The Table
 The kitchen I am keeping the decorations pretty simple. Because of the small space in our kitchen it already feels cluttered with dishes and utensils so to add alot of decorations seemed like it would just add too much to the room. So the first thing I did was only put two chairs around our table since there is only me and my husband. I angled them so they didnt look so straight and boring.
  The family sign in the back was made by my Aunt Kristin. It is blocks of wood painted with holes drilled in the top to string the ribbon through. I alternated high and low to give it some character before hanging them on a small curtain rod. Getting ribbons the even at the right length was the hard part. I laid them on the ground which made it alot easier. I think when it comes to things like this everyone finds their own tricks.
For the centerpiece it was all about antique or thrift stores and garage sales. I found the half gallon blue jar at a garage sale which was awesome! They came in a pair and my Mom got the other one. then I found the quart sized jar at a thrift store and couldnt pass it up. That was about the time I got the idea to use them together and started to keep my eyes out for other sizes. I was so excited to find the pint sized jar at an antique store I grabbed it immediately. I didnt spend more than a couple dollars on the jars. Then I just wrapped twine on the top and but in some white flowers that can look just as pretty dry as they can blooming in water. All that was needed was the doily underneath, which I also picked up from a thrift store. And wha-la a beautiful antique centerpiece!
Project Kitchen

As you can see most everything is still in boxes! It seemed like such a daunting task I wasnt sure where to start. My idea for the kitchen was a rustic county feel. I wanted it to have a warm sunshine picnic feeling as well as a barn type feeling.

To hide some of the clutter from our wedding gifts, dishes and bowls. I put a stack of shelves on the other side of the fridge so that it isnt seen by everyone coming in and out of our home.
The Beginning of the Rest of My Life
 Well so many people have blogs and some of them are really neat! Im not sure mine will be all that interesting but I think blogs are a good way to chronicle the things that interest you and the things that you do. I just got married so I am just now learning how to be a wife to a wonderful man, how to be a cook, and a homemaker. Its amazing all that goes into making a house feel like a home! There are so many projects that I already have in mind and I have found inspiration from so many different places already! I cant wait to show everyone.
A little background on me. I met Trevor last December and we got married the beginning of September, we knew eachother a little less than a year. But what a great year it has been. Trevor is my everything he makes me laugh, he dreams with me, we enjoy alot of the same activities, and he listens to me. We recently moved into a new apartment in a new town. Which is alot of new if you ask me. Its been an adventure getting to know a new place and getting to know eachother even better than before.
Subscribe to:
Posts (Atom)